Winner, Winner, Chicken Dinner

Standard

No matter what I try, my family insists that they need three meals every day.  

Three meals! 

Thats three meal preps, three loads of dishes, three rounds of wiping toddler goo off the chairs…

Even though I love to cook, that adds up to a lot of time in the kitchen.  Time I could be using in other constructive ways, or just managing my littles and maintaining some semblance of peace.  To help keep things in balance, I indulge in fix-n-forget cooking several days a week and my current go-to is oven roasted chicken with vegetables.  It’s simple, versatile, and (so far) my family loves it.  


Oven Roasted Chicken and Vegetables

  • 4 large chicken leg quarters (with skin)
  • 4 medium potatos
  • 4 carrots
  • 1 lb brussle sprouts
  • 1 tsp salt
  • Non-stick cooking spray

Preheat the oven to 400 degrees.


Spray roasting or cookie pan with non-stick cooking spray and lay out chicken, leaving space between the pieces for veg.


Cut carrots into chunks about 1×1/2 inch.  Embrace a bit of un-uniformity here, its a good homey dish and still looks good a bit rustic.  Place the carrots on the pan around the chicken (this might be the most important part of the instructions.  If the carrots are not directly on the pan they will not be tender before the end of the cooking time).


Clean and halve the brussle sprouts.  Then add them to the pan.


Cut scrubbed potatos into 1-2 inch cubes and place them on top of the other vegetables.  

Spray the chicken and assembled vegetables with non-stick cooking spray and sprinkle with salt.  


Place in your pre-heated oven and walk away for 1 hour.  When you return, supper will be ready.  I like to use my hour of waiting time to clean the kitchen and get a few end of day tasks done so I will have minimal cleanup to do while I’m trying to wrangle the littles into bed.  

Now for the versitlity I spoke of earlier.  Once you’ve made this dish a few times, you might want to start playing around with other vegetable combinations.  Celery, green beans, pearl onions, cherry tomatoes, broccoli, cauliflower, and parsnips are all tasty options.  However, don’t add quick cooking vegetables like green beans, cherry tomatoes, and broccoli until halfway through the baking time.  I also think sweet potatoes would be a great addition, but my husband can’t abide even the smell, so I might never know.

Really, the only limitiations on this dish is what your family will eat and the size of your pan! What vegetables would you add?  

Failure and Success: Vintage Kwik Sew 626

Standard


Maybe you have figured this out, but I’m not very good at following patterns.  Usually, I have no intention of actually following the pattern and use the prefrabricated pieces as a guide for cutting and nothing more.  This time, I whole heartedly planned to follow the rules of sewing and make the pattern properly.  

I tried, really I did.


It all started out with this vintage Kwik Sew 626.  I thrifted it several years ago (envelope in much better condition) because I wanted to make the blouse.  However, when I got it home, only the skirt pieces were in the envelope.  So it just sat in the drawer until now.

When I started this project, I thought I wanted a nice, plain Jane, everybody’s got them kind of skirt.  The grey rayon/poly suiting in my stash seemed like just the thing.  So, I got started resizing the pattern.  Here is where the problem started.  

Since I was resizing the pattern anyway, I decide to just go ahead and add 9 inches to the lenth.  I love a long skirt.  

Then I widened the waist band…heaven knows why.  Because I could?

I resisted the urge to add inseam or patch pockets.  


When I went to cut out my pattern, I discovered that by lenthing the skirt I no longer had enough fabric to cut it on the bias like the pattern instructed.  No worries.  My fabric had more than enough drape on it’s own.  

After that, I was a good obedient seamstress for awhile.  I was actually patting myself on the back for the minimal adjustments I had made.  I even stuck to Kwik Sews rediculiously tiny 1/4 inch seam allowance!  

Then it was time to try on my skirt for heming.  It was so boring!  I can go for the librarian look, but this was 1850’s orphanage matron.  Not my vibe.  

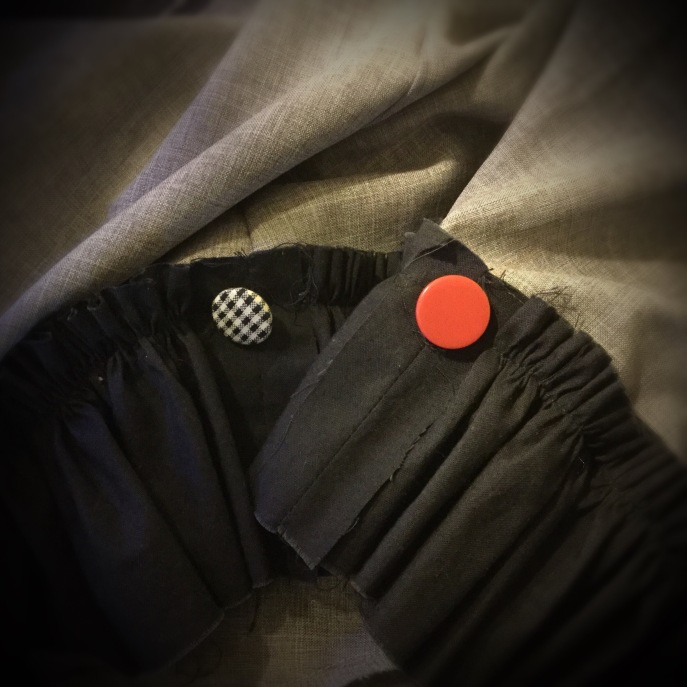
I knew I would never wear it as is, so I grabbed a lenth of black broad cloth I thrifted this past fall and set about cutting strips for ruffles.  I cut a very generous ruffle.  So generous, that my husband actually voiced doubts about rather I could make it fit around the hem of my skirt.

Don’t try me, babe.


After I serged the skirt hem, I applied the ruffle leaving the edges raw to fray.  Even then, it wasn’t quite enough so I stitched a random button from my stash at the conjunction of each ruffle segment.  

Perfection!  

I’ve worn it 3 times in the past week, styled differently each time.  Now I am planning a high-low over-skirt to add yet another option.  

Just WOW!

Standard


Last Monday morning, I woke up to a message announcing that I had been nominated for a Liebster Award.  It was just the pick-me-up I needed after the weekend that had just unfolded.  Thank you, Hira from Hira’s Cookshack (if you don’t know already, this lady has some mean recipes she shares-check it out).  

I really had the best intentions to get on with my part of the deal immediately, but choosing eleven amazing blogs ended up being harder than I thought.  Not for the lack of wonderful bloggers, but for the plethora of them.  Then I had to determine if the blog was still small enough to qualify for the award.  


Hira’s Questions are as follows:  

1. How did you come up with the name for your blog?  It was pretty easy.  I am Sissy and I make stuff, hense “SissyMakes”.  It is also a play on a name my husband uses for me that combines my names: SissyMacK.  

2. Pick one word to describe the last book you read? DEEP

3. What is the weirdest dream you can remember having?  When I was pregnant with my fifth child, I had a dream that I was giving the cat a bath and it turned into a baby.  

4. What’s the most fascinating thing you’ve encountered this week? My two year old’s ability to aim and pee into which ever container she finds available at the time.  

5. Why did you start blogging?  It was a fun way to share what I love and to connect to other creative individuals.

6. What’s your biggest goal in life?  Raise my children to be loving, creative, adventurous individuals and then retire with my husband to live in a van by the river ….no really, we want to live in a van by the river.  

7. If you could have any superpower, what would it be and why? The ability to not require sleep, I could get so much more done if I never got tired!  

8. What’s your favorite thing to blog about? My makes!

9. If you could hang out with one character from a book or movie, who would you choose? Mrs. Weasley from Harry Potter

10. What is your life changing moment?  The moment I decided that being me was more important than being who other people thought I should be.  

11. What is the best compliment you have ever received?  When people tell me my kids are great, it really puts things into perspective for me.  Sometimes I feel like the youngest three are so out of control, but they are just figuring out their boundaries and getting to know themselves in a rather noisy way.  With them being so close in age, it just get overwhelming sometimes.  
***Eleven Random Facts About Me***

1.  I am a Montana girl, but left in my teens and spent 15 years in the South before returning.

2. My favorite color is orange.

3.  Salsa is my favorite food.

4.  Nobody makes biscuits better than mine-except Bojangles.  

5.  I have completely useless degree in Fashion Design.

6.  Tattoos are my big addiction.  

7.  If nobody else is around, I will spend all day watching cooking shows.

8.  Wrestle Mania is my favorite holiday.  

9.  I don’t function before coffee.

10.  Waste is my big pet peeve and I pride myself on being resourceful.

11.  Goats are my favorite animal.  

Now I get to nominate some of my favorite small blogs.  I love following each of you and just want you all to know that you inspire me.  

1.  Dawn’s Dress Diary

2.  Wrong Doll

3.  She Sews You Know

4. Chronically Siobhan

5. Treadlemusic

6. Afrugalspinster

7. That’s Sew Basic

8. Boo Wholefoods

9.  The Stepmama Blog

10.  A Drawerful of Porridge 

11.  Emma and Her Machine

Now it’s my turn to ask the questions!

1.  What is your favorite thing about yourself?

2.  If you could travel anywhere in the world, where would it be?

3.  What is your favorite creative medium?

4.  What is your geeky secret? (I am a WWE fan)

5.  How would you describe your style?

6.  When did you start writing?

7.  Why did you start writing?

8.  What is your favorite dessert?

9. Do you prefer fiction or non-fiction?

10.  What was the last movie you watched?

11.  Which continent do you live on?

Watching and Waiting and Waiting and Waiting…

Standard


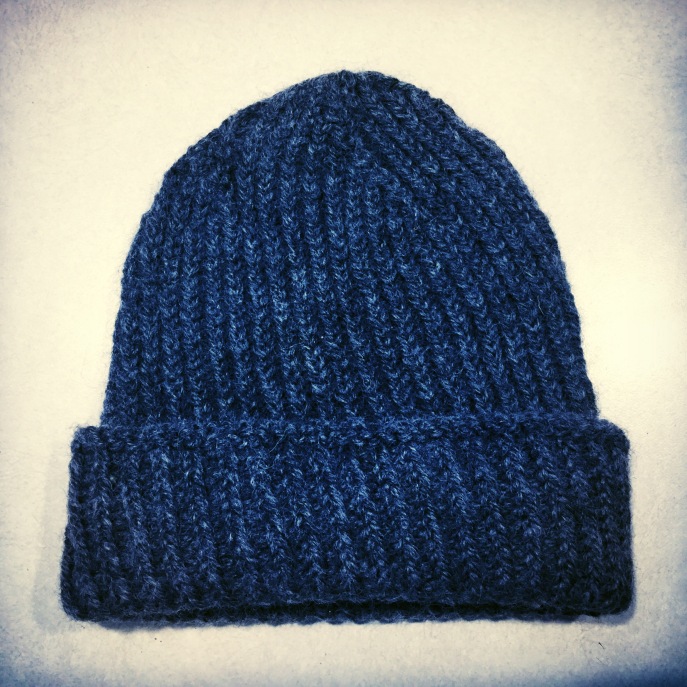
It seems like it was forever ago that I made this watchcap.  My middle son asked for it back in October and I didn’t even get it finished until early December, now it’s late February and I am finally blogging it.  

Photo Links to Pattern


I had been wanting to make this Marsan Watchcap for awhile and had it on my Yarning board on Pinterest.  The only specific Mr. Man had for his hat was that it be warm and grey, so I took the opportunity and ran with it.  My version is knit in Paton’s Classic Wool from JoAnn’s, just like the Hubby Hat.  Of course, I bought it on sale.  

I can’t believe how handsome this guy is!  He is my quiet, quirky, science geek who you would never know was in the room until he serves you up a big old slice of his opinion (or you stepped on one of his LEGOS).  


Oh, yeah, the hat.  It’s pretty nice too.


Actually, the hat is pretty great.  I love how easy and concise the pattern is written and the twisted stitch ribbing adds a lot of depth.  When I turned the piece to begin slanting the rib in the opposite direction, I did end up with a little hole in my work, but I was able to ease that out when I blocked the hat.  Unfortunately, when his sister took the photographs for this post she didn’t get the cool swirl on top of the cap.      

Love the kid, love the watchcap and I will certainly be making this pattern again.  I am considering making the larger version the pattern designer offers to see if it is large enough for the hubby.  

Love In A Bowl

Standard

This past week, I was minding my own business (for once), going through the checkout with every single package of marked down chicken in the store when I was suddenly the center of attention.  The cashier, a woman in her mid 50’s, asked what I was going to do with all that chicken.  Laughing, I told her that my husband was from the South and I was stocking up to make chicken and dumplings.  (As my dear friend K would say, chicken and dumplings is his love language.)  

“Oh, do you put celery in your chicken soup?” The cashier asked.

“Yes, along with onions and carrots.”

“How do you make your dumplings?  Do you use Bisquick or biscuits in the roll?”

I stared at her dumbfounded.  Bisquick?  

“You know, to make the dumplings…” She prompted.

“Um…um…I make mine from scratch.”  I stammered, looking around in a daze. 

“How?”  This time the voice was from behind me.  I turned to see a pretty 20-something staring at me with expectation.

“With flour and eggs, baking powder…  It’s easy…”At this point, I should have just rattled off my recipe, but I was still befuddled.  I had never heard of making dumplings any way other than from scratch.  Maybe I’m behind the times (my husband does say that I cook like his great grandmother).

While intriguing in hindsight, the incounter didn’t end with me looking highly intelligent.  I think I mumbled something about “rolled dumpling, Google it.”  

Great answer smarty!  So in attempt to make the world a better place, one bowl of soup at a time, and maybe save some face I am going to share my recipe now.

Rolled Dumplings

  • 2 1/2 cups flour
  • 1 TBL baking powder
  • 1/2 tsp salt
  • 2 eggs
  • 3/4 cup milk
  • 1 gallon (or more) simmering broth/stock

Start by making a good flavorful broth or stock.  Get it heating on the stove and if you are using stock you made previously add any vegetables/meat you may want…don’t forget salt!

In a large bowl stir together flour, baking powder, and salt.  Clear a well in the center of the mixed ingredients and drop the eggs and milk.  Whisk slightly with a fork before incorporating into the dry ingredients.  

Once the dough is mixed, plop it out onto a floured counter top and dust with flour. Roll out into a big sheet like you would if making cookies or biscuits, the thickness depends on personal preference.  I roll mine out to 1/4 inch since hubby likes rather roubust dumplings, but thinner makes a more delicate noodle-like dumpling that some folks prefer.  

Using a butter knife, cut the dough into one inch strips then cut across the strips in two inch intervals to create individual dumplings.


One by one, drop the dumplings into the simmering broth.  As the pot begins to fill up, you will have to stir down the dumplings on top to make room for each new addition.  Luckily, these are not like fragile drop dumplings and will not fall apart and make a mess in your soup.  

When you have all the dumplings in the pot, turn the heat down slightly.  Cover and let simmer for 45 minutes or until the dumplings are tender.

There you have it easy and comforting!  It also ends up being a very budget friendly meal.  Last time I made chicken and dumplings I figured out that I fed the 5 of us 4 meals for less than $8.  


Drive Through Delicious 

Standard

My husband and I love coffee.  I mean LOVE coffee.  


Most of our pre-children dates included coffee and now our moka pot is percolating 3-4 times a day.  We don’t get a lot of one on one time, so meeting on the couch for a cupp’a is a ritual we keep atleast twice durring the day.  


Quite a bit less frequently are our trips out to buy coffee.  Our favorite drinks cost upwards of $5 each (damn inflation!) and a long drive in the country with a cup of coffee just isn’t as peaceful as it once was.  


Last week my husband came up with a plan to duplicate our favorite drink here at the house.  I was charged with making it happen and the results are amazing!  For less than $1.50 we can both have a delicious cup of specialty coffee while we snuggle on the couch.  Thus far, we’ve managed to keep the secret from the kids, so for now we can indulge in peace.

Sweetheart Coffee

  • 2 double shots espresso
  • 3 cups milk
  • 1/3 cup white sugar
  • 6 Andes Mints


Unwrap and drop three Andes Mints in each of two large mugs.


Brew four shots (2 double shots) espresso while warming the sugar and milk in a heavy saucepan over med-low heat.  Keep a close eye on the milk and stir frequently.  Heat until it just begains to froth.

When the coffee is brewed, pour it over the candies in the mugs and stir briefly to melt.  Top off with the steaming milk and enjoy!


The Hubby Hat

Standard

When you ask your husband to model his new hat…

…He is bound to do something silly.  

Now to the real story.

Last spring, hubby left his toboggan (here in Montana a toboggan is a sled, but those silly North Carolina folks apply the word to winter headgear) laying on a table at the library.  It was never seen again.

So, I offered to knit him a new one.  Maybe not my smartest move, as he hassled me continually about when it would be finished.  I should have just made it incognito and then handed it to him when it came off the needles.  It would have been a much more peaceful knit.  

This was one of my ninja knits, but I was smart this go around and took notes so I can duplicate it.  I knit with Paton’s Classic Wool in worsted, holding two strands together as one.  Since I am notoriously cheap, I only bought one skein of yarn (on sale, with a coupon, of course) and seperated it into two equal balls.  It wasn’t quite enough, so even the not so decerning eye can see that the hat came up a bit short.  However, he says it is warm and we both like the style.  I plan to start a second version soon with the left over grey from Mr. Man’s hat (blog post to come) and an additional, matching skein I’ll pick up at JoAnn’s.  

In the Nursing Student gang, this sign means, “Oh, crap! I should have studied last night.”

The band and the crown are knit separately, with a tiny amount of crochet tossed into the mix. Maybe there is an official word for combining these techniques, but I usually refer to them as “fusion projects.”    

Memory Muffins

Standard

Back when I was a little girl, somebody gave my mom a recipie for Weight Watchers Apple Sauce Muffins.  They were horrible things: gummy, with a dreadful soda aftertaste.  However, my mom loved the idea of an apple sauce muffin and made it her mission to create one that was as amazing.  Being an excellent baker, she was highly successful and created a recipie that quickly became a family favorite.  

My mother’s version of the muffin is far from Weight Watcher approved, but we don’t mind.  These breakfast miracles are wonderfully sweet and spicy with a crunchy outside and an interior of moist deliciousness.  While I make mine a bit different than even mom did, both versions are amazing and I’ll let you in on a few secrets and options.  

Apple Sauce Muffins

1/2 cup butter, softened

1 cup white sugar

1 egg

1 cup apple sauce

2 cups flour

1 tsp baking soda

1/4 tsp salt

1 1/2 tsp cinnamon (mom’s recipie only calls for 1 tsp)

1 tsp freshly grated nutmeg (mom used allspice)

1/4 tsp cloves

1/2 cup chopped almonds (mom used walnuts)


No mater which version you are using, start by preheating your oven.  I use a large, double size, muffin tin and heat my oven up to 335 degrees.  Mom used a standard sized tin and heated the oven to 350.

 Cream together butter, sugar, and egg.  Add apple sauce.  It doesn’t look really tasty at this point, but believe me, it gets better.  

 In a separate bowl combine flour, baking soda, salt, and spices.  Mix well.

Incorporate the dry ingrediens into the wet then fold in the nuts.

Scoop into unlined muffin tin that has been prepped with non-stick cooking spray.  The recipie makes 12 standard sized muffins or 6 large muffins. Bake the smaller muffins at 350 for 20 minutes or the larger muffins at 335 for 30 minutes.

 Once muffins are baked through  and pass the toothpick test, remove from oven.  Transfer to cooling rack immediately and let stand for atleast 5 minutes.  Eat as is.  No butter or jam required.  

My mom says these store well, but I really don’t know.  I can remember eating them at room temperature as a kid, but at my house they never survive past breakfast time.  

Snow Day Tunic

Standard

Nothing beats the comfort of a nice cozy sweatshirt, but that’s just not my style.  In my life, sweatshirts (hoodies) are for hiking or working outdoors.  For everyday, I want something cozy with a bit more cute factor.  

My fabric was two yards of a 60 wide poly/cotton blend double knit.  I knew from the moment I saw it on the bolt that I had to turn it into a winter tunic.  It sat in my stash for a few months while I found time to make garments for everyone else, but this past week I finally decided that with Halloween and Christmas finally out of the way I was sewing for me.  So I started drafting.

For a hint of causal sweatshirt appeal, I had planned to leave all my hems unfinished so they would roll.  However, once I started working I discovered that the fabric wasn’t going to hold up to that as I expected.  So I stitched the collar over, leaving a hint of roughness where the asymmetrical split falls open.  I did proper finishing on the cuffs and hem.  Looking at the collar now, I wish I had just gone and made a self binding. The seams were all serged, so it came together very quickly.  

The back has an arched yoke and a cute pleat detail, but I since I had to photograph myself again I was unable to get a good image of the back.   

I wore it to run some errands yesterday and since it was a bit chilly, I tossed my favorite cardi over top.  I was really happy with how the two layered.  My next project for me is going to be a black and grey skirt that I think will round out this look really well.  I’ve been wearing jeans for more than usual lately and it’s time to get back to skirts and dresses.  

Out of Season Stitching

Standard

Right in the middle of Christmas sewing, I decided to take a break and finish up this dress from my UFO pile. Honestly, I don’t know how it got into my UFO pile in the first place. It’s cute as a button, cut from a simple pattern, and uses two great vintage fabrics. Most likely, it’s companion dress was to blame…notice only one is finished.

This dress is made from McCall’s M6015, which believe it or not, I purchased new and it is made pretty close to pattern specs.  The lined bodice in place of facings and the giant pockets are my only alterations.  Saddly, since I cut it out so long ago (**cough, cough**this past May), I have no idea what size I used and somewhere over the summer and fall most of the pattern pieces disappeared, hopefuly just to the wrong envelope.  

Since it is now winter and we have six inches of snow on the ground, this dress is being worn jumper style.  However, Dark Moon is not bothered by this in the least.  In fact when I first pulled it out of the UFO pile and tried it on her, she was quite insulted that I took it back.  Here she is wearing it almost immediately after I finished it, so that the hem hasn’t even been pressed.  

When I first decided to just go ahead and finish this dress, we were all in the middle of that nasty cold I told you all about.  It was the middle of a excruciatingly long day and I just needed something to take my mind of the misery.  That’s when I found this dress and I really thought I was looking at an afternoon’s worth of work.  Just quickly inserting the zipper, then tacking down the lining and the hem would have finished up the job.  However, inserting a zipper in a Benadryl haze is not quite as easy as it sounds… I picked the zipper out twice before I finally got a result I was happy with.  Hubby thought it was hysterical, but I was less than amused.  By that point I was over it, so I didn’t get around to the tacking for a few more days.  

It took her awhile to notice the bucket sized pockets, but once she did it was true love.  The first wear alone, they held everything from blocks, to her constant companion “Fox,” to a handful of pickles.  My husband went so far as to suggest that she could carry her baby brother in one.  

I use to make these dresses three at a time for my older daughters, but right now I am thinking one is enough.  It’s fun and adorable, but I really think I’m ready for a new go-to dress for little girls.